Completing the Cloudflare SSL SiteGround setup is one of the best upgrades you can give your website. SiteGround is renowned for its speed. Additionally, Cloudflare is the world’s leading Content Delivery Network (CDN). Therefore, when you combine them, you get a faster, more secure website with a global reach.
However, the configuration process confuses many site owners. For instance, you might be wondering: “If SiteGround already gives me a free SSL, why do I need Cloudflare’s?” Alternatively, perhaps you tried to set it up, but your site suddenly crashed with a “Too Many Redirects” error.
Unfortunately, these are common pitfalls. The interaction between SiteGround’s server-side encryption (Let’s Encrypt) and Cloudflare’s edge encryption requires specific settings to function correctly.
🚀 Need this handled by experts? If touching DNS records or nameservers makes you nervous, Click here to order our Configuration Service. We will handle the entire Cloudflare SSL SiteGround setup for you, ensuring zero downtime and maximum security.
In this extensive guide, we will walk you through the manual integration method. Consequently, this gives you full control over your security settings, unlike the limited built-in integration found in Site Tools.
[Image: cloudflare-ssl-siteground-setup-thumbnail.jpg] Alt Text: Split screen showing SiteGround Site Tools and Cloudflare dashboard for the Cloudflare SSL SiteGround setup.
Why Use Cloudflare SSL with SiteGround?
Before diving into the steps, it is important to understand why this setup is superior. SiteGround provides a free “Let’s Encrypt” certificate, which encrypts data between your server and the visitor.
So, why add Cloudflare?
-
Double Encryption: Cloudflare adds a second layer of security at the “Edge.”
-
DDoS Protection: Furthermore, it hides your SiteGround server IP address from attackers.
-
Speed: Cloudflare serves your images and CSS from servers closest to your visitors. As a result, this significantly reduces load times.
To achieve this, the Cloudflare SSL SiteGround setup must be precise. Otherwise, if the settings misalign, your site will break. Let’s get it right the first time.
Prerequisite: Enable SiteGround SSL
This is the most critical pre-step. However, before pointing your domain to Cloudflare, you must ensure your site works with HTTPS on SiteGround first.
Cloudflare works best in “Full (Strict)” mode. Therefore, this requires a valid certificate on the origin server (SiteGround).
-
First, log in to your SiteGround Client Area.
-
Go to Websites and click Site Tools for your domain.
-
Next, navigate to Security > SSL Manager.
-
Ensure a Let’s Encrypt certificate is Active.
-
Finally, if not, select “Let’s Encrypt” from the dropdown and click Get.
Once your site loads securely via https:// without Cloudflare, you are ready to begin the Cloudflare SSL SiteGround setup.
Step 1: Create Account and Scan DNS
We will use the manual setup method. Specifically, this involves creating a direct account with Cloudflare rather than using SiteGround’s “CDN” button.
-
Go to the Cloudflare Website and sign up.
-
Click Add a Site and enter your domain name (e.g.,
yourwebsite.com). -
Then, select the Free Plan and click Continue.
-
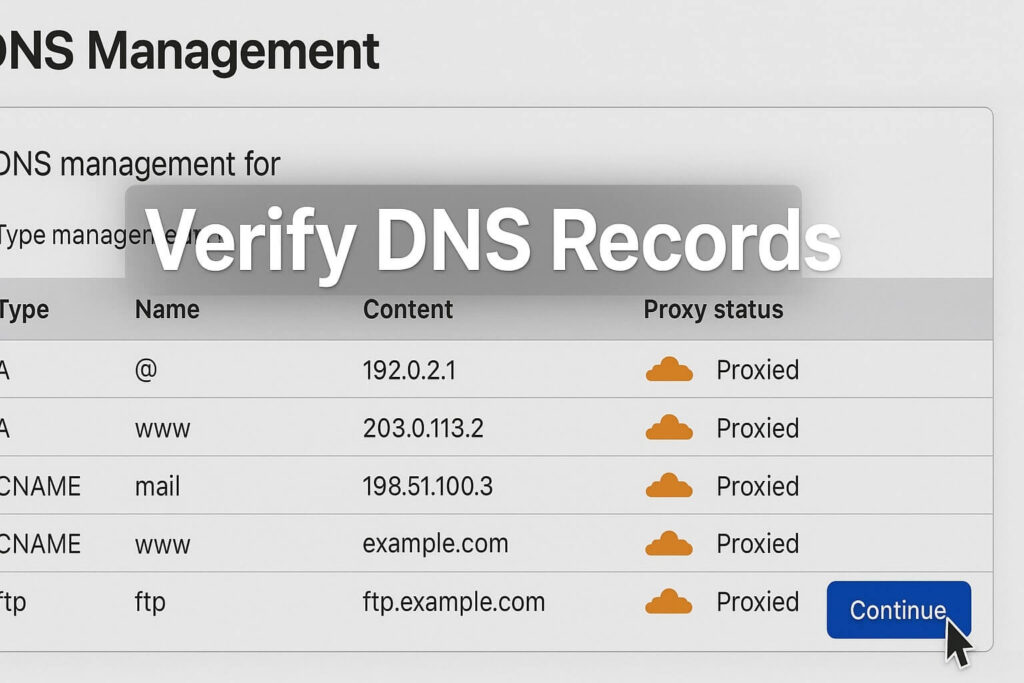
Cloudflare will scan your DNS records.
-
Review the Records: Ensure the
Arecord points to your SiteGround IP address (you can find this in Site Tools). -
Lastly, click Continue.
Step 2: Update Nameservers for Cloudflare SSL SiteGround Setup
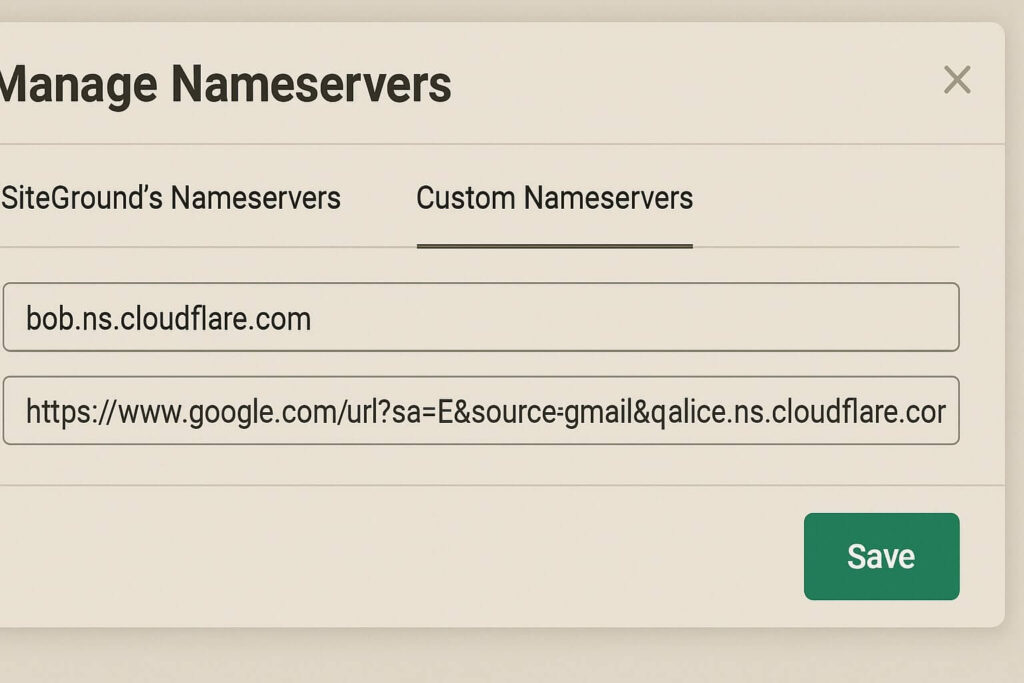
Cloudflare will now provide you with two nameservers (e.g., bob.ns.cloudflare.com and alice.ns.cloudflare.com). Consequently, you must replace your SiteGround nameservers with these.
This step allows Cloudflare to intercept traffic and apply the SSL layer.
If your domain is registered with SiteGround:
-
Go to SiteGround Client Area > Services > Domains.
-
Click Manage next to your domain.
-
Next, find Nameservers and click Manage.
-
Select “Custom Nameservers”.
-
Then, paste the two Cloudflare nameservers.
-
Click Save.
If your domain is elsewhere (GoDaddy, Namecheap):
Log in to that registrar and update the nameservers there.
Note: Propagation can take anywhere from 1 hour to 24 hours. However, once Cloudflare detects the change, you will receive an email confirmation.
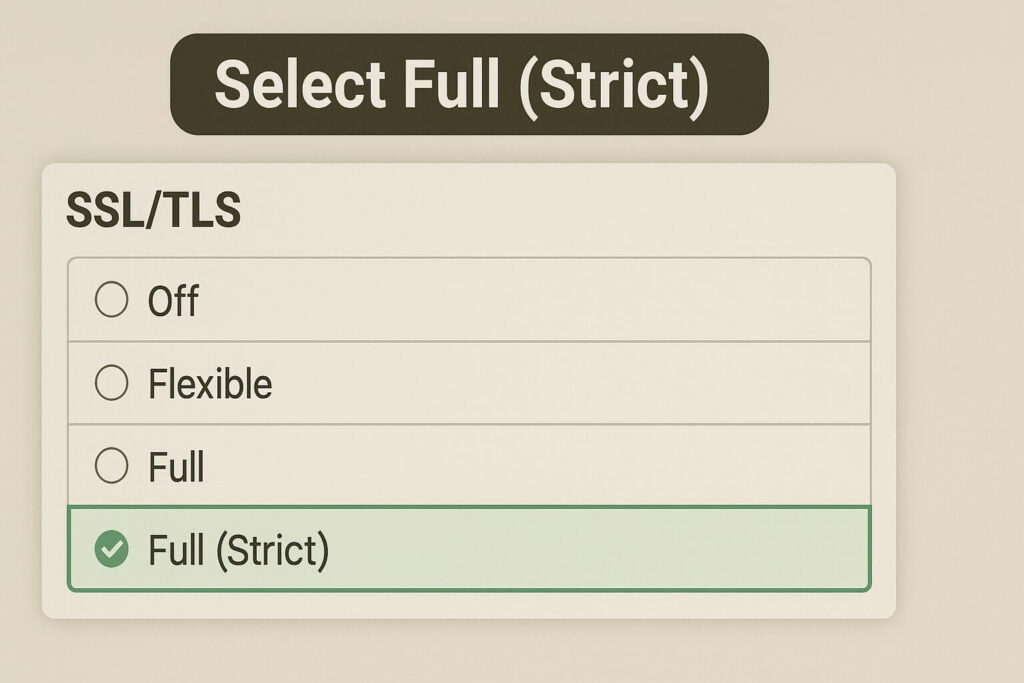
Step 3: Configure the SSL Mode (Crucial Step)
This is where 90% of people fail the Cloudflare SSL SiteGround setup.
Once your site is active on Cloudflare, you must select the correct encryption mode. Because you already installed an SSL on SiteGround (in the Prerequisite step), you must tell Cloudflare to respect that.
-
Log in to Cloudflare.
-
Click on the SSL/TLS icon in the sidebar.
-
Select “Full (Strict)”.
Why Not “Flexible”?
-
Flexible: Cloudflare encrypts traffic to the user, but sends traffic to SiteGround via HTTP. Since SiteGround forces HTTPS, this creates an infinite loop (Cloudflare sends HTTP -> SiteGround redirects to HTTPS -> Cloudflare sees redirect -> sends HTTP again).
-
Full (Strict): On the other hand, this mode encrypts traffic to the user AND encrypts traffic to SiteGround using the valid Let’s Encrypt certificate. Thus, this is the correct setting.
Step 4: Force HTTPS and Automatic Rewrites
Now that the encryption tunnel is established, you need to ensure no visitor accidentally accesses the insecure version of your site.
-
In the SSL/TLS menu, click on the Edge Certificates tab.
-
Then, scroll down to “Always Use HTTPS”.
-
Toggle this ON.
-
What this does: It forces every visitor to use the secure version, improving SEO and security.
-
-
Next, scroll down to “Automatic HTTPS Rewrites”.
-
Toggle this ON.
-
What this does: It fixes “Mixed Content” errors by dynamically rewriting “http” image links to “https” before the page loads.
-
These two settings complete the core Cloudflare SSL SiteGround setup configuration.

Step 5: Verify the Configuration
After waiting a few hours for DNS propagation, verify your setup.
-
Visit your website in an Incognito/Private window.
-
Then, click the Padlock icon in the browser bar.
-
Click “Connection is secure” > “Certificate is valid”.
-
Look at the “Issued By” field.
-
It should say “Cloudflare Inc” (or similar). This confirms traffic is passing through Cloudflare.
-
-
Finally, if the site loads correctly, your Cloudflare SSL SiteGround setup is a success.
Troubleshooting Common Issues
Even with a perfect guide, things can go wrong. Here are quick fixes for common errors during the Cloudflare SSL SiteGround setup.
Error: “Too Many Redirects” (ERR_TOO_MANY_REDIRECTS)
-
Cause: Your Cloudflare SSL mode is set to “Flexible” while SiteGround is forcing HTTPS.
-
Fix: Change Cloudflare SSL setting to “Full (Strict)”. Subsequently, clear your browser cache.
Error: Site is Down (522 Connection Timed Out)
-
Cause: Cloudflare cannot reach SiteGround.
-
Fix: Ensure your Cloudflare IP addresses are not blocked in the SiteGround security plugin (Site Tools > Security > Blocked IPs). Also, verify the “A Record” in Cloudflare DNS matches your SiteGround IP.
Error: Mixed Content Warnings
-
Cause: Some assets are hardcoded as HTTP.
-
Fix: Install the Really Simple SSL plugin on WordPress or use the “Automatic HTTPS Rewrites” toggle in Cloudflare (Step 4).
Conclusion on Cloudflare SSL SiteGround Setup
Integrating these two powerful platforms provides your website with enterprise-level speed and security for free. The secret lies in the handshake: ensuring SiteGround has a certificate, and then telling Cloudflare to use Full (Strict) mode.
By following this manual Cloudflare SSL SiteGround setup, you avoid the limitations of plugin-based integrations. Furthermore, you gain full control over your DNS and firewall rules.
Summary of Steps:
-
SiteGround: Activate Let’s Encrypt SSL.
-
Cloudflare: Add site and scan DNS.
-
Registrar: Point nameservers to Cloudflare.
-
SSL Mode: Set to Full (Strict).
-
Edge Certs: Enable Always Use HTTPS.
Still having trouble? If you are seeing errors or don’t want to risk downtime, let us handle it. 👉 Check Out Our Service Price Plan for professional configuration, or Contact Us Here with your specific error message for advice.