Finding the perfect LiteSpeed Cache settings Hostinger configuration is the single most effective way to speed up your WordPress website on a shared server. You signed up for Hostinger because of its speed reputation, but out of the box, your site might still feel sluggish. You installed the LiteSpeed Cache plugin, but the overwhelming number of toggles and options left you confused.
This is a common struggle. LiteSpeed Cache (LSCache) is the Ferrari of caching plugins, but if you don’t know how to drive it, you won’t go fast. In fact, incorrect settings can actually break your site layout or cause resource limit errors on shared hosting.
The good news is that Hostinger servers are “LiteSpeed Native.” This means they are built to communicate directly with this plugin, offering performance gains that other hosts simply cannot match. You can read more about this technology in the official LiteSpeed Documentation.
🚀 Need this configured perfectly? If you are afraid of breaking your site’s CSS or hitting resource limits, Click here to order our Speed Optimization Service. We will apply the optimal LiteSpeed Cache settings Hostinger sites require and boost your Core Web Vitals score within one hour.
In this extensive guide, we will cut through the noise. We will walk you through the exact configuration profile we use for our clients on Hostinger, ensuring maximum speed without stability issues.
Why LiteSpeed Cache Settings Hostinger Plans Need Are Unique
To apply the right configuration, you must understand the environment. Hostinger Shared Hosting places your site on a server with hundreds of other users. While powerful, these plans have strict limits on CPU and RAM usage.
If you enable aggressive settings like “CSS Combination” or “Guest Mode” without caution, the server has to work too hard to generate files. This can trigger “503 Service Unavailable” errors.
Therefore, the best LiteSpeed Cache settings Hostinger users can apply are a balance between Aggressive Caching (saving static files) and Conservative Optimization (limiting CPU usage).
Step 1: Presets for LiteSpeed Cache Settings Hostinger
If you are a beginner, LiteSpeed recently introduced “Presets.” This is the safest way to apply the LiteSpeed Cache settings Hostinger recommends without touching individual toggles.
Navigate to LiteSpeed Cache > Presets.
Recommended Profile: Choose “Advanced (Recommended)”.
Why? The “Essentials” profile is too weak, while the “Extreme” profile often breaks themes like Divi or Elementor on shared hosting. The “Advanced” profile includes CSS/JS minification but avoids dangerous combinations.
Click “Apply Preset.”
However, presets are generic. For true speed, you need to manually tweak the specific tabs below.
Step 2: Cache Tab Configuration for LiteSpeed Cache Settings Hostinger
This is the most critical section. These settings control how long your server stores files. For the ideal LiteSpeed Cache settings Hostinger profile, use these values:
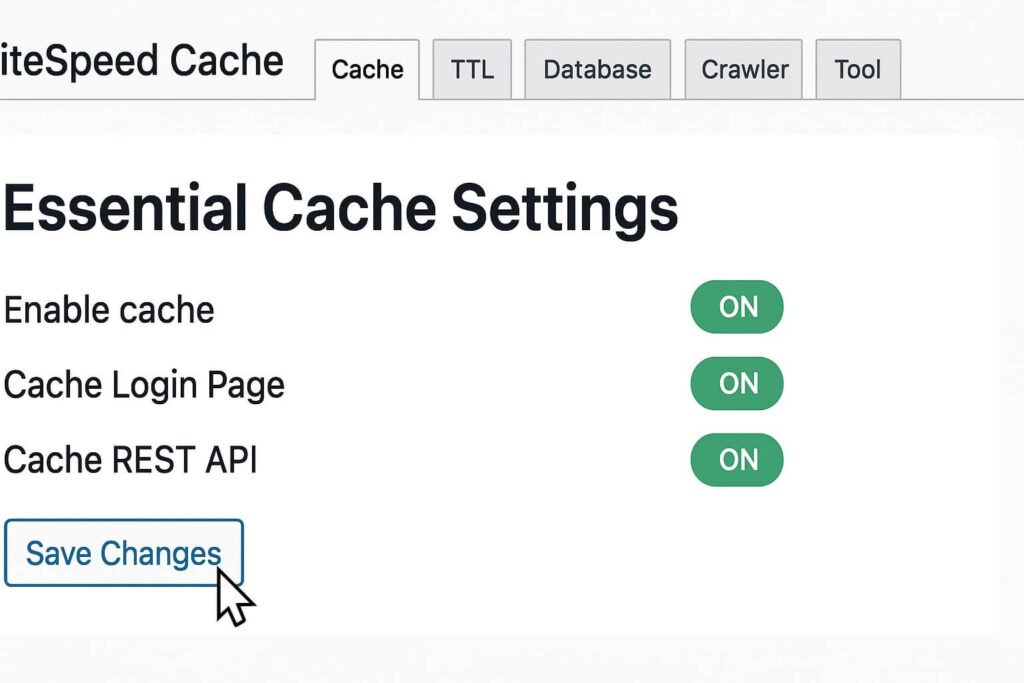
Navigate to LiteSpeed Cache > Cache > [Cache] Tab:
Enable Cache: ON (Essential).
Cache Logged-in Users: OFF (For blogs/business sites) or ON (For membership sites). Keeping it OFF saves server resources.
Cache Commenters: OFF.
Cache REST API: ON.
Cache Login Page: ON.
Cache Favicon.ico: ON.
Mobile Cache: OFF (Unless you have a specific mobile-only theme. Modern responsive themes do not need this and it wastes storage).
Step 3: Page Optimization in LiteSpeed Cache Settings Hostinger
This section creates the most visible speed improvements but causes the most broken layouts. We will configure this carefully to avoid conflicts, ensuring these LiteSpeed Cache settings Hostinger servers can handle.
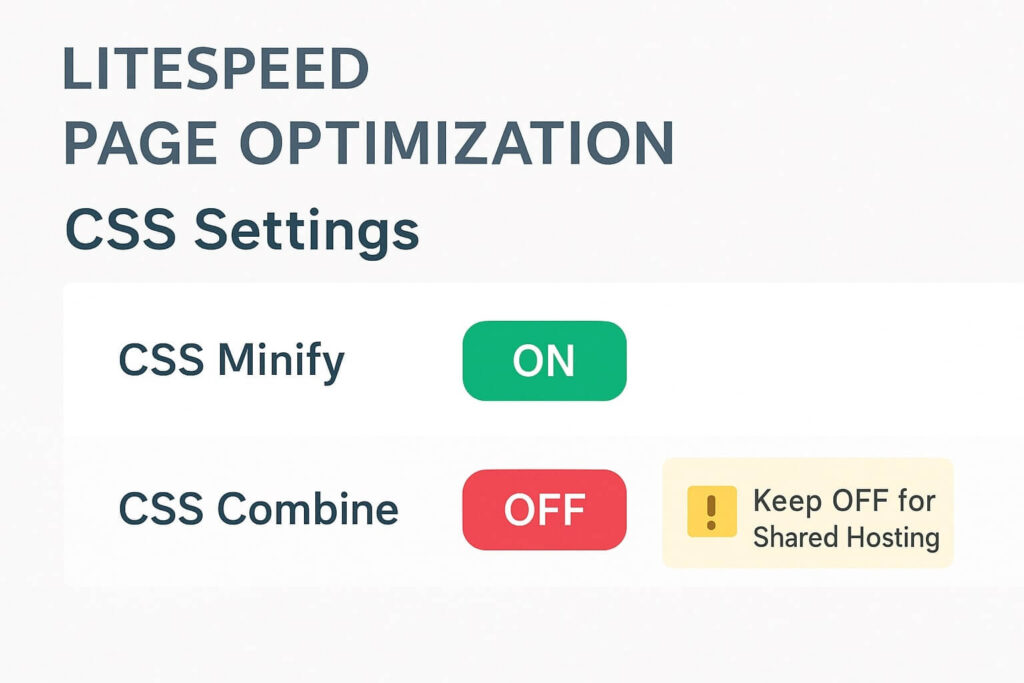
Navigate to LiteSpeed Cache > Page Optimization > [CSS Settings] Tab:
CSS Minify: ON. (Removes whitespace to shrink files).
CSS Combine: OFF.
Critical Note: On Hostinger Shared plans, combining CSS uses heavy CPU power. HTTP/2 (which Hostinger uses) handles multiple small files better than one giant file. Keeping this OFF prevents CPU spikes.
CSS Combine External and Inline: OFF.
Load CSS Asynchronously: OFF (Can cause FOUC – Flash of Unstyled Content).
Generate Critical CSS: OFF (Too resource-intensive for shared plans).
Navigate to [JS Settings] Tab:
JS Minify: ON.
JS Combine: OFF. (Same reason as CSS).
JS Combine External and Inline: OFF.
Load JS Deferred: Delayed.
Pro Tip: This is the “Magic Switch.” It stops scripts from loading until the user interacts with the page. If your slider or menu breaks, switch this back to OFF or add the script to the exclusion list.
Step 4: Image Optimization for LiteSpeed Cache Settings Hostinger
Images often make up 50% of a page’s weight. LiteSpeed has a built-in optimizer that sends images to their cloud server, compresses them, and sends them back. This is perfect for LiteSpeed Cache settings Hostinger plans because it offloads the CPU work to LiteSpeed’s servers, not yours.
Navigate to LiteSpeed Cache > Image Optimization > [Image Optimization Settings] Tab:
Auto Request Cron: ON.
Auto Pull Cron: ON.
Optimize Original Images: ON.
Remove Original Backups: OFF (Keep them just in case).
Create WebP Versions: ON.
Image WebP Replacement: ON.
Note: After enabling this, click “Gather Image Data.” It may take a few hours to process your library. To check the impact of these changes, you can test your site on GTmetrix.
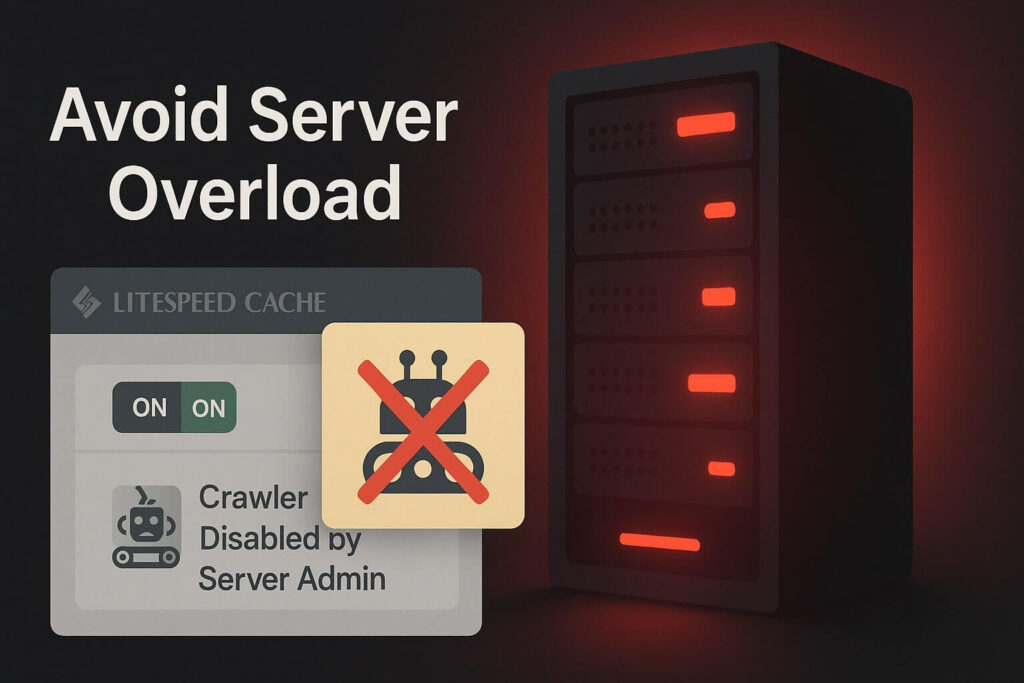
Step 5: Crawler Issues in LiteSpeed Cache Settings Hostinger
The “Crawler” visits your pages automatically to create a cache file before real visitors arrive. However, Hostinger often blocks the LiteSpeed Crawler on shared plans to prevent server overload.
To check if you can use it:
Go to LiteSpeed Cache > Crawler.
Enable it.
If you see a warning or your server usage spikes to 100%, Disable it immediately.
For most Hostinger Shared plans, the safest LiteSpeed Cache settings Hostinger recommendation is to keep the Crawler OFF. Rely on real visitors to build the cache.
Step 6: Database Optimization
Over time, your database fills with trash like post revisions and spam comments.
Navigate to LiteSpeed Cache > Database.
Clean All: Click this button once a month.
Revisions Max Number: Set this to 5 or 10 in the [DB Optimization Settings] tab to prevent bloat from returning.
Conclusion on LiteSpeed Cache Settings Hostinger
Configuring your site for speed doesn’t have to be a guessing game. By acknowledging the limits of shared hosting and prioritizing lightweight optimization over aggressive combining, you can achieve sub-1-second load times.
The key takeaway for the best LiteSpeed Cache settings Hostinger users can adopt is: simpler is often faster. Enable Minify, Disable Combine, and leverage the server-level caching.
Summary of Configuration:
Cache: Enable everything except Mobile Cache.
Optimize: Minify CSS/JS but DO NOT Combine.
Images: Enable WebP replacement.
Crawler: Keep OFF on shared plans.
Still Seeing a Slow Site? If you have applied all these settings and your site is still sluggish, you may have a heavy theme or too many plugins. 👉 Contact Us Here for a deep-dive performance audit, or visit our Services Price Plan page to see our affordable optimization packages tailored for Hostinger users.