🚨If your WordPress website is suddenly facing frustrating redirect issues to strange websites, showing fake “Google Chrome update” pop-ups, showing Japanese keywords in your Google Search results, or opening intrusive, unknown ads—you are definitely facing a malware infection. When security software like Sucuri or other third-party tools start flagging serious malware on your site, it’s a terrifying experience that needs immediate action. This urgent situation calls for a complete WordPress Malware Removal plan to clean and secure your site immediately.🚨
🛠️ The Definitive Guide: How to Manually Remove Malware from WordPress (No Paid Tools Required)
We are seasoned website security experts who have helped countless businesses and blogs successfully recover from severe malware attacks. We know exactly what to do. You can view our professional WordPress malware removal portfolio here.
This is your complete, step-by-step guide on how to remove malware from your WordPress site—designed to be followed easily, even if you have zero technical knowledge!
By following these instructions properly and sequentially, you can fully clean your website manually. You’ll not only remove the malicious code but also secure your site to prevent future infections, all without spending money on paid plugins or expensive cleanup services. Get ready to take back control; your website will be clean and secure once more.
Step 1: Perform a Full Website Backup (Critical Risk Mitigation)
Before attempting to remove malware from wordpress site, a complete, recent backup is your single most important safety net. This is the first critical action in your journey to fix WordPress hacked site issues safely, ensuring that if anything goes wrong during the cleanup process, you can immediately restore your site to its current (hacked) state without risking permanent data loss.
Instruction:
To ensure you have a fallback, immediately install a reliable, free backup plugin on your WordPress site. We recommend one of the following:
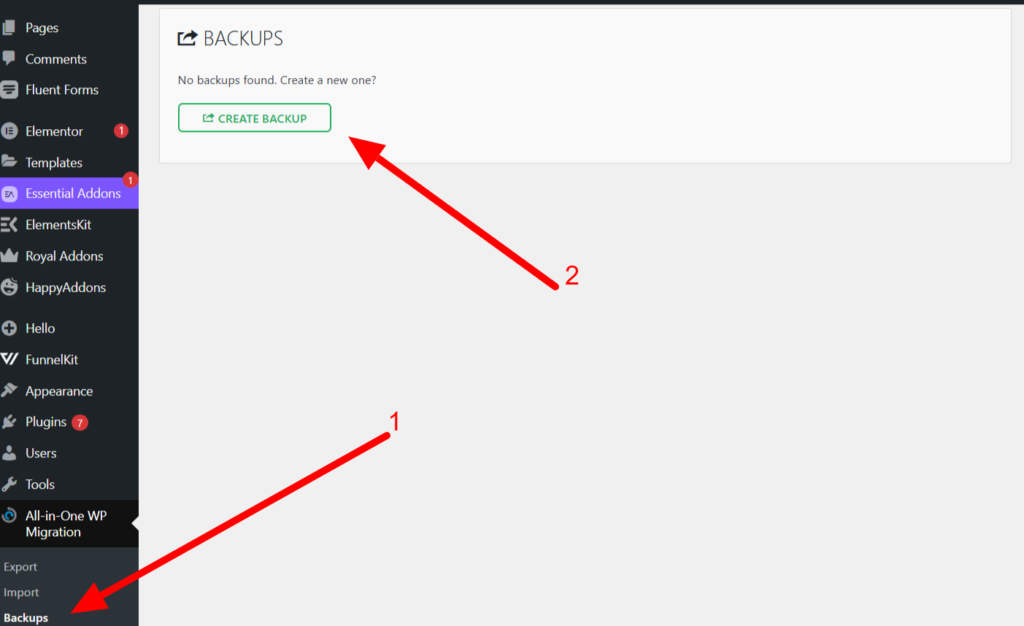
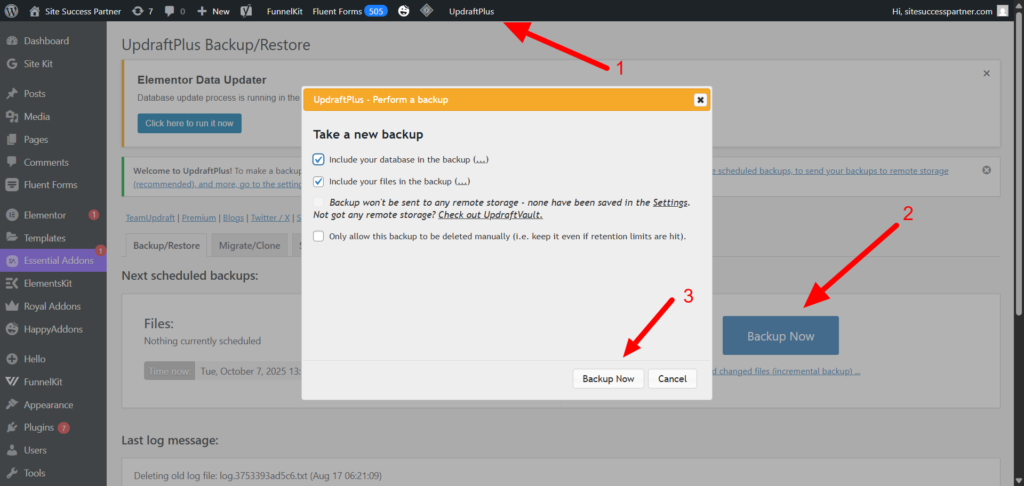
Once installed, use the plugin to create a full backup of your website, encompassing both the core files and the database.
Why a Backup is Essential: Taking a backup is the most crucial action before proceeding with malware removal. Manually deleting malicious files or making changes to the database carries an inherent risk; a single mistake can break your website entirely. Your first priority is securing a full, working snapshot of your site using one of the free methods above.
💡 Expert Note (Save Disk Space): If your hosting provider offers a daily backup or has its own robust, integrated backup system (often accessible via your cPanel or hosting dashboard), utilize that feature instead. This is often faster, more reliable, and won’t consume additional disk space on your web server.
Step 2: Eliminate Vulnerabilities by Updating All Plugins and Themes
A crucial part of understanding how to remove malware from wordpress site successfully is closing all known security loopholes that the infection often exploits. Once your website backup is successfully complete, your next move is to eliminate these vulnerabilities.
Update Your Plugins: Navigate to your Plugins section within the WordPress dashboard. Update every single plugin that shows an available update notification. This proactive measure is essential for comprehensive WordPress Malware Removal. If you are using premium (paid) plugins, ensure you manually get the latest version file from the developer and update them, as outdated paid software is a prime target for security exploits and malware attacks.

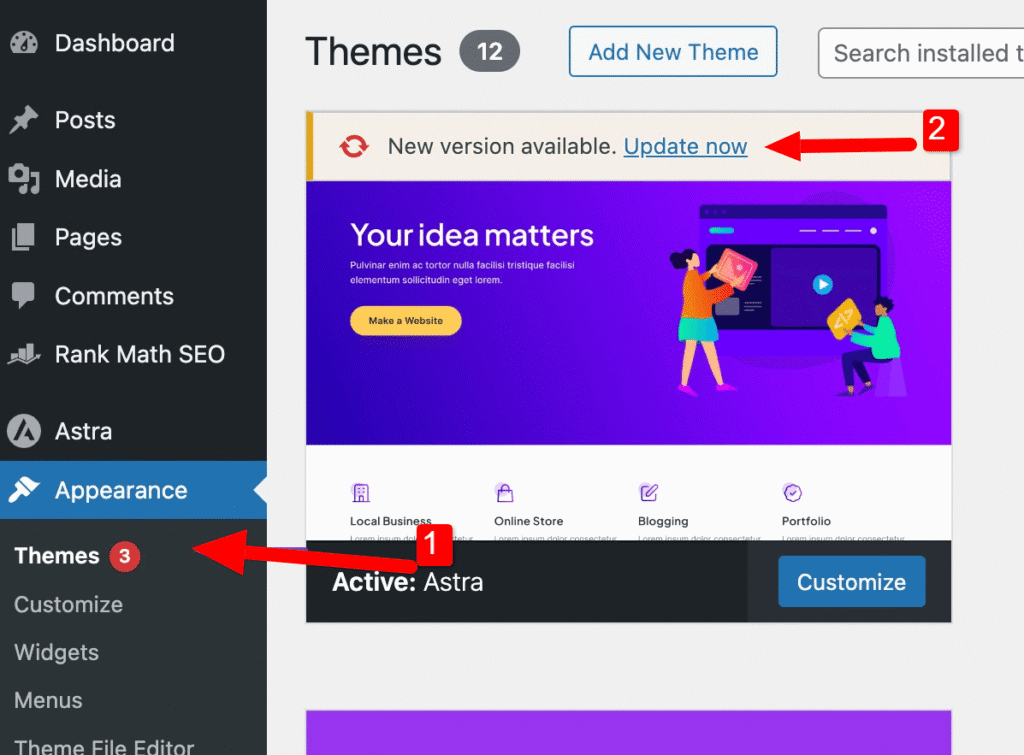
Update Your Theme: Do the same for your active theme. Check the Appearance Themes section for update notifications. If your theme is a paid one, obtain the latest version of the theme files from the source and perform a proper update.
Crucial Warning and Reassurance:
It is absolutely vital that you do not skip a single plugin or theme update. Leaving even one piece of software outdated can create a massive vulnerability that hackers can easily exploit to reinfect your website, making effective WordPress Malware Removal impossible if the back door remains open.
Since you wisely took a full website backup in Step 1, you don’t need to worry about the site breaking or displaying errors after a major update. If anything goes wrong, you can simply restore the full site back to its pre-update state.
Step 3: Replace All WordPress Core Files with a Fresh Copy
Malware frequently injects hidden code into standard WordPress core files. To learn how to remove malware from WordPress site effectively, we delete the suspicious files and replace them with a fresh, clean copy.
Access and Preparation: You will need access to your hosting File Manager (e.g., cPanel, hPanel) or an FTP/SFTP client. Once you have access, navigate to your site’s root directory. You can now safely delete the two main core folders and several standalone PHP files, which will be replaced with the clean files you just downloaded.
Folders to Delete/Replace: Delete all the wp-admin and wp-includes folders, including all .php files located in the root directory (except wp-content and wp-config.php). Then, replace the deleted files and folders with the ones from the latest version of the WordPress zip file, which you can download here. (Note: After extracting the new WordPress zip file, delete the wp-content folder before uploading.) Check the screenshot for a proper idea of which files to delete. Only delete the folders and files highlighted in blue.
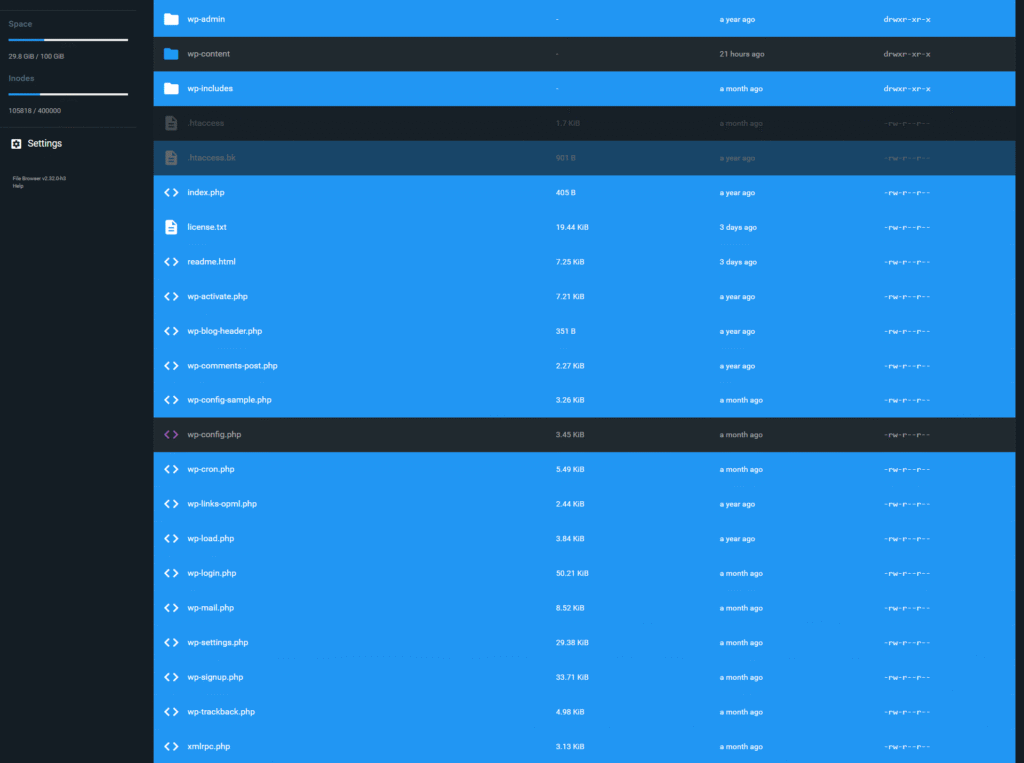
⚠️ CRITICAL WARNING: DO NOT TOUCH THESE FILES ⚠️
This step is irreversible without your backup. Do not delete or replace the following two elements, as they contain all your website’s data and custom settings:
- The entire wp-content folder: This holds all your themes, plugins, and uploaded media.
- The wp-config.php file: This is the heart of your site, containing your database login credentials.
After deletion, upload the fresh copy of the wp-admin and wp-includes folders, as well as all the fresh root .php files, to complete the replacement.
Step 4: Scan and Manually Delete Malware Files from wp-content Folder
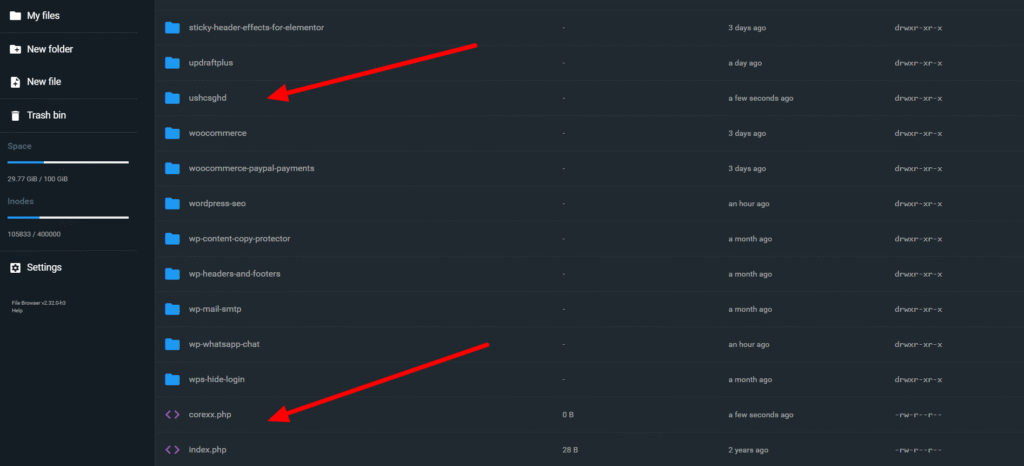
Navigate to the wp-content directory in your File Manager (or FTP client). You need to properly examine the following folders for any unfamiliar or suspicious files and folders:
- Plugins: Check every plugin folder for unexpected .php files (especially in the root of the plugin) or folders with strange names.
- Themes: Check your active theme, looking for new, strange files (often named things like cache.php, config.php, or files with random character names) placed outside of standard template files.
- Mu-plugins (Must-Use Plugins): This folder is a prime hiding spot. Delete any files or folders here that you did not intentionally place.
Step 5: Delete All Unknown or Suspicious User Accounts
After cleaning out the malicious files and folders from the wp-content directory, the next step to effectively fix WordPress hacked site issues is to delete any unknown user accounts that the attacker may have created as a persistent backdoor. This action is critical to completely remove malware from wordpress site and block future access.
Action: Inspecting Your User List
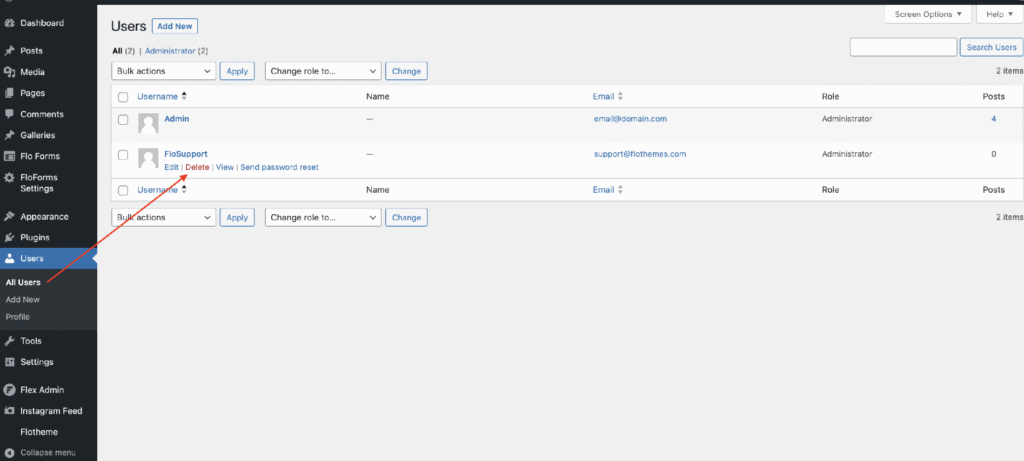
Navigate to the Users section in your WordPress dashboard. Carefully check the entire list for any users that meet the following criteria:
- Unknown Administrator Accounts: Hackers most often create new accounts with Administrator privileges.
- Suspicious Editor or Subscriber Accounts: Even lower-level roles can sometimes be exploited.
- Unrecognized Usernames: Look for generic, randomly generated, or unexpected usernames.
The Deletion Process:
When you select an unknown user for deletion, WordPress will prompt you regarding the content (posts/pages) authored by that user.
Always choose to: Attribute the content created by the deleted user to your main, legitimate administrator account. This ensures that none of your valuable posts or pages are lost when the malicious user account is removed.
Once you have reviewed and transferred any associated content, proceed to delete the suspicious user permanently.
Step 6: Delete All Unknown and Malicious Posts, Pages, and Categories
After properly dealing with the unauthorized user accounts, your next priority in WordPress Malware Removal is to eliminate the spam content and persistent backdoors the malware injected into your database and content structure.
Action: Inspecting Posts and Pages
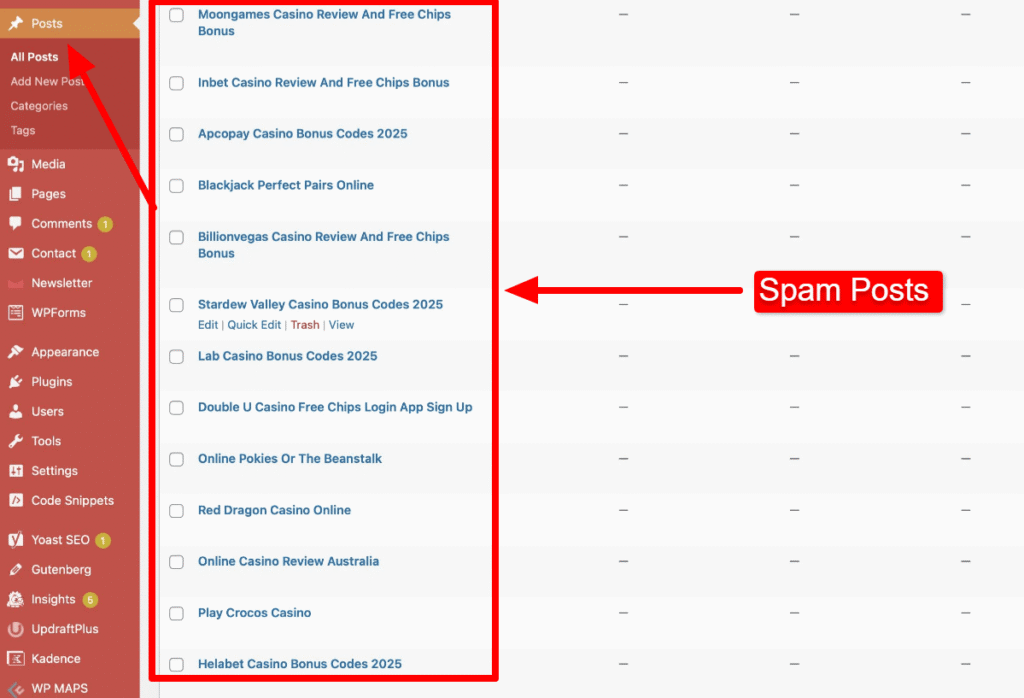
Navigate to the Posts and Pages sections of your WordPress dashboard. You need to properly review these lists for any content that meets the following criteria:
- Unauthorized Topics: Look for posts related to spam, gambling, foreign languages, or any content entirely unrelated to your site’s niche.
- Suspicious Dates: Content created very recently that you know you didn’t publish.
Select and permanently delete all this malicious content. This is a critical step in learning how to remove malware from wordpress site completely.
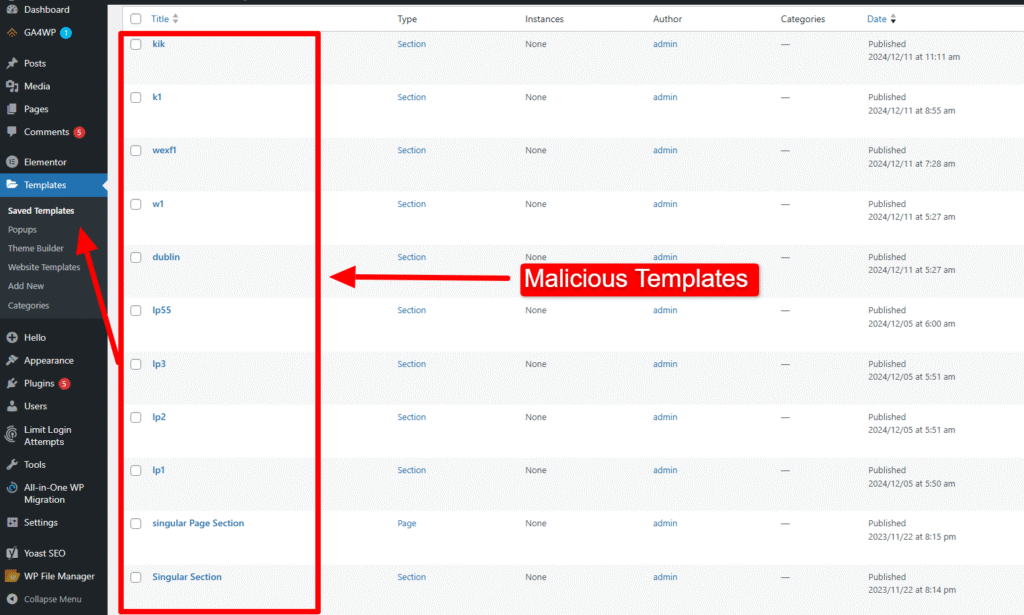
Cleanup: Categories, Tags, and Templates (Elementor Users)
Next, check your Categories and Tags sections. Hackers often create spam categories (like “Casino” or random foreign phrases) to organize their malicious posts. If you find any category or tag that you did not create, delete it immediately.
Crucial Check for Elementor Users: If you are using the Elementor Page Builder, navigate to the Templates section. Malicious scripts or backdoors can be secretly inserted into unknown or newly added templates. Review your entire template library, and if you find any templates you did not create, delete them immediately and permanently delete them.
Final Cleanup Warning: Make sure you empty the Trash for all Posts, Pages, and Templates afterward to ensure the spam content is truly deleted from your database.
Step 7: Use Wordfence to Complete the Cleanup and Fix Your WordPress Hacked Site
After manually deleting all suspicious content, we’ll use a trusted security plugin to run a comprehensive scan and set up a protective firewall. This step is critical to fix your WordPress hacked site completely.
Action: Installation and Setup
First, install the free Wordfence Security plugin from the WordPress repository. Once installed, activate the plugin, enter your email for the security key, and complete the basic setup.
Run a Deep Scan
- Navigate to the Wordfence → Scan section.
- Before running the scan, look for the Scan Options and Scheduling section and adjust the Resource Consumption to the highest setting. This ensures the scanner is thorough.
- Click START NEW SCAN.
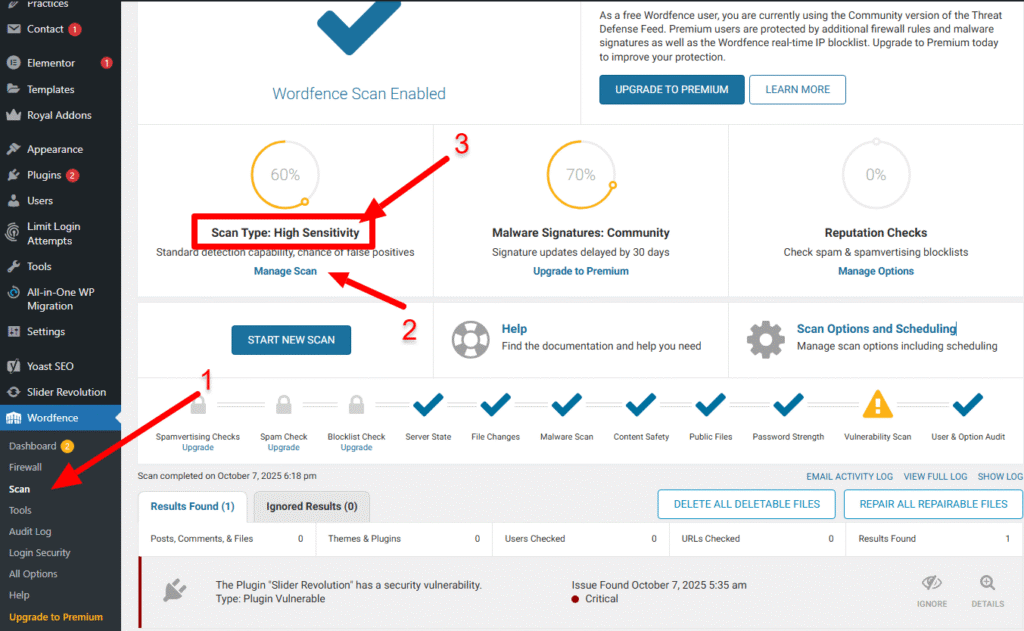
Interpreting Results and Deletion
Once the scan is complete, review the results carefully to guide your next steps on how to remove malware from a WordPress site. Wordfence will flag files that are infected, suspicious, or differ from the official WordPress source, providing you with the necessary information for cleanup.
CRITICAL WARNING: Do not delete files blindly.
You should focus on files marked “Critical” or shown in red. These are most often the malicious files or folders that need to be removed. Use the tools Wordfence provides to “Delete all deletable files & Repair all repairable files” or compare the file to the official version and remove the malware code.
When performing a WordPress Malware Removal, deleting essential WordPress or theme files can easily break your website. Only proceed with deletion when the plugin clearly identifies a file as malicious or a part of an unapproved hack.
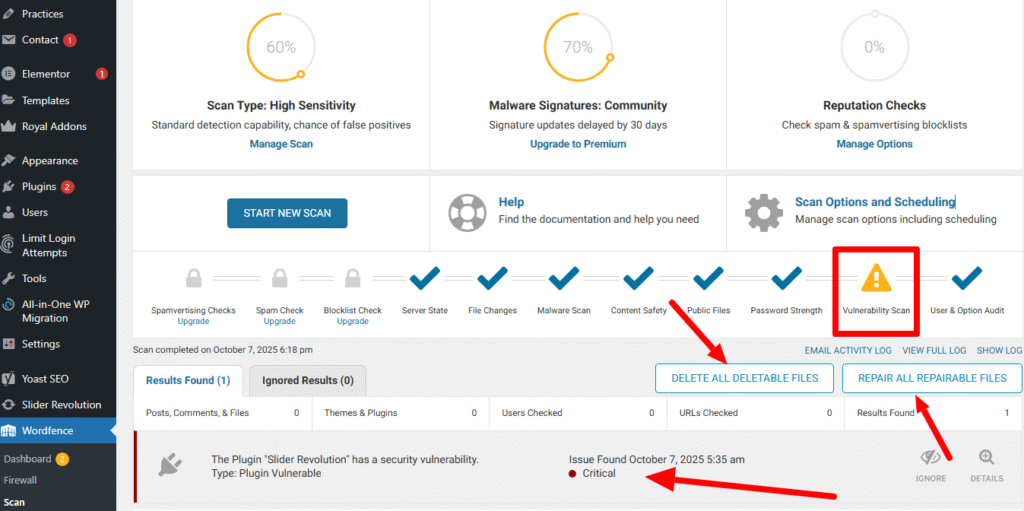
The screenshots below will clearly demonstrate how the “red files” appear in the scan and how to run the scan properly without damaging your website.
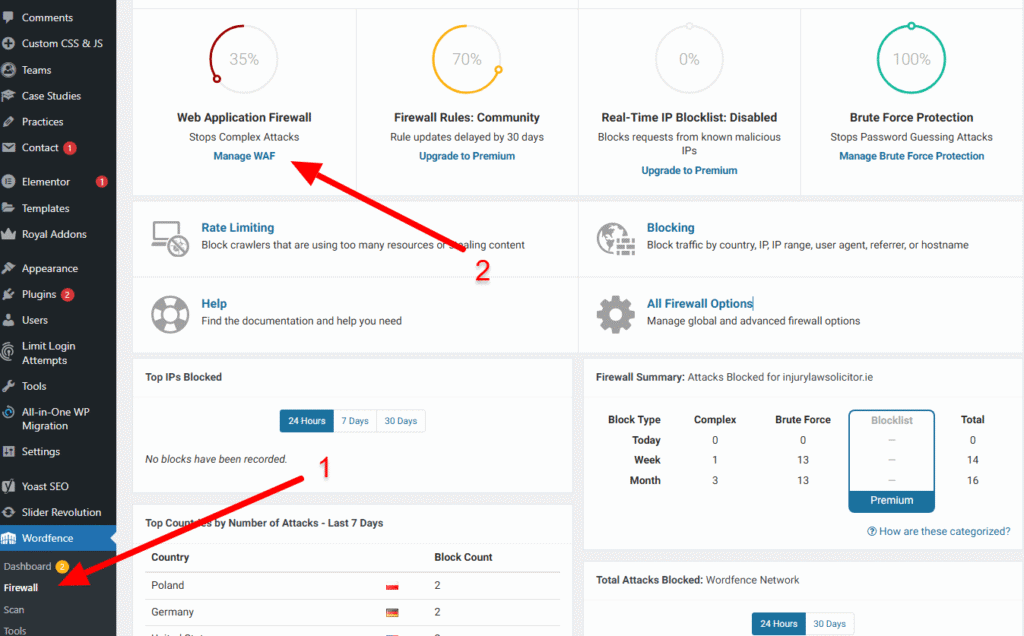
Enable Extended Firewall Protection
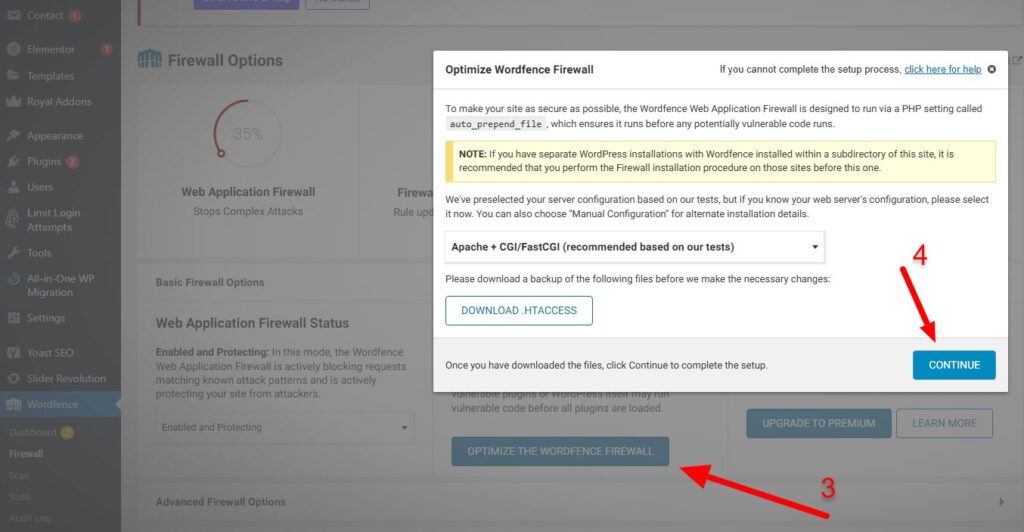
With all malware successfully removed, the final, crucial step to permanently fix WordPress hacked site security is to activate the Wordfence Web Application Firewall (WAF) for ongoing, proactive security. This powerful, real-time WAF runs before WordPress loads to block malicious traffic, including XSS, SQL injection, and advanced bot attacks, ensuring continuous, layered protection for your newly cleaned website.
To enable the Extended WAF:
Go to Wordfence → Firewall.
Click the Manage WAF section and select Optimize the Wordfence Firewall.
Download the .htaccess backup file when prompted, then click Continue to complete the optimization.
Step 8: Final Database Malware Removal
Even after cleaning the files, malware often leaves a backdoor or spam content injected directly into your database tables. This final, highly technical step removes these persistent threats.
⚠️ Critical Warning: ALWAYS create a full database backup via phpMyAdmin (Export) before proceeding, as deleting the wrong data can break your website.
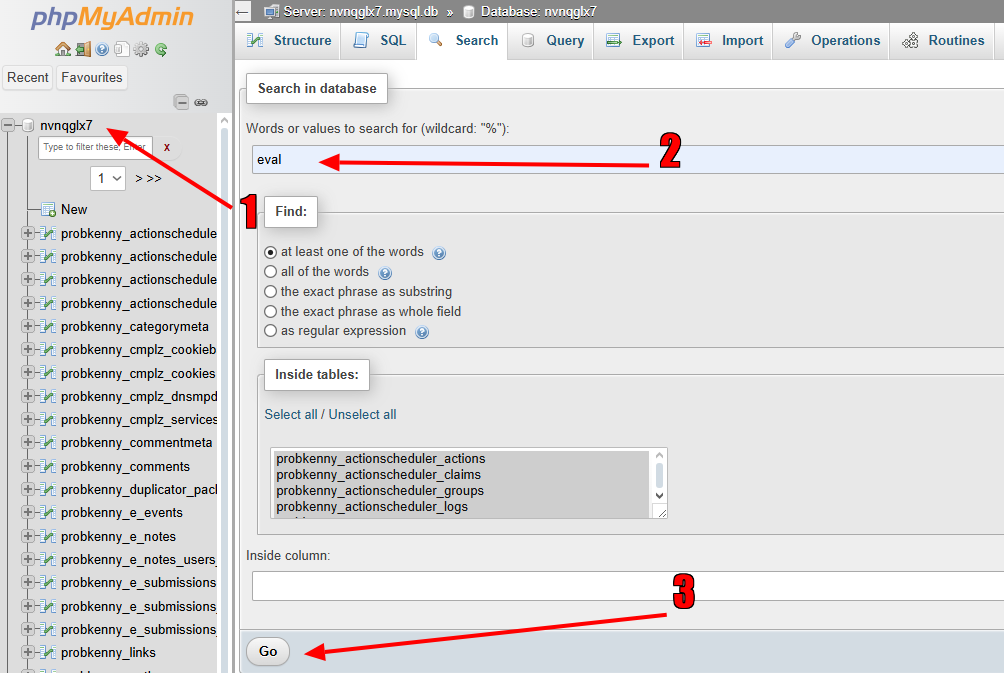
- Access phpMyAdmin: Log into your hosting control panel (cPanel) and open phpMyAdmin.
- Locate Database: Find your site’s database name (found in your wp-config.php file) and click it.
- Search for Malicious Strings: Use the Search function (or run an SQL query) to look for common malicious commands, often injected by hackers for spam or redirection:
- eval
- base64_decode
- <script
- Suspicious URLs or keywords (if you know the spam topic).
If suspicious code is found within tables like wp_options or wp_posts, carefully check the entire row/entry. If it is confirmed to be malware (often large blocks of encoded text or spam links), delete the row one by one—a critical step in learning how to remove malware from a WordPress site
Once these malicious database entries are deleted, your core website is now fully cleaned of the infection.
Step 9: Strengthening Security, Prevention & Maintenance
Your website is now clean. These crucial final steps ensure it stays that way by hardening security and establishing automatic maintenance routines.
1. Secure the Admin Path (Login URL)
Brute-force attacks constantly target the default wp-login.php or wp-admin URLs.
- Action: Install a lightweight plugin like WPS Hide Login (or the WP-Hide plugin you mentioned) to change your WordPress login URL to a secret, custom path (e.g., yoursite.com/my-secret-login). This instantly blocks 99% of login attempts from automated bots.
2. Restrict XML-RPC Access
The xmlrpc.php file is a known target for DDoS and Brute Force attacks. Edit your .htaccess file (in your site’s root directory) and add the following code at the bottom:
# Block WordPress xmlrpc.php
<Files xmlrpc.php>
Order Deny,Allow
Deny from all
</Files>
3. Enable Permanent Maintenance Routines
| Tool | Action | Benefit |
| UpdraftPlus | Enable Daily Full Backups to a secure remote location (like Dropbox or Google Drive). | Ensures a clean restore point is always available if the site is ever compromised again. |
| Wordfence | Confirm the settings are configured for Daily Scans. | Automatically detects new malware, changed files, and vulnerabilities before they become a problem. |
🛡️ WordPress Malware Removal: Final Security Note
A successful clean hacked WordPress website job depends on maintaining good hygiene going forward.
DO NOT use any nulled or pirated themes or plugins. These products are the most common source of reinfection, as they are intentionally bundled with hidden backdoors or malware, creating a critical vulnerability that hackers can exploit to attack your newly secured website. Understanding how to remove malware from wordpress site includes knowing the source of future attacks—always use official, reputable software.
Frequently Asked Questions (FAQ)
What is the biggest risk when I try to fix WordPress hacked site myself?
The biggest risk is damaging your site during file or database cleanup. To avoid this, the first step must always be a complete backup. Following the guide carefully minimizes the chance, ensuring you successfully fix WordPress hacked site without permanent breakage.
Should I continue using nulled/pirated themes after I clean hacked WordPress website?
Absolutely not. Nulled plugins or themes are the primary cause of reinfection. Using pirated files voids the hard work of your clean hacked WordPress website and will force you to either repeat the process or hire a costly wordpress malware removal service soon after.
How do I prevent reinfection after WordPress Malware Removal is complete?
Successful WordPress Malware Removal relies on hardening the site afterward. This involves changing all passwords, deleting unrecognized users, replacing compromised files, and immediately setting up a robust Web Application Firewall (WAF) like Wordfence.
When should I hire a professional wordpress malware removal service?
You should consider a wordpress malware removal service if: 1) The infection is highly persistent or returns immediately; 2) You are uncomfortable with technical steps like using phpMyAdmin; or 3) You need immediate results. Otherwise, the guide details precisely how to remove malware from wordpress site yourself.
Will this process hurt my Google rankings?
No, quite the opposite. Learning to fix WordPress hacked site and removing malicious code will ultimately help your rankings by removing Google's "This site may be hacked" warnings and restoring user trust, a key SEO factor.
How to remove malware from WordPress site?
Perform a full website backup to mitigate risks. Update all plugins, themes, and replace WordPress core files with a fresh copy to eliminate vulnerabilities. Scan and manually remove malware from the wp-content folder, and delete unknown or suspicious user accounts, posts, pages, and categories. Use Wordfence to complete the cleanup and fix your WordPress hacked site. Clean your database of malware and strengthen security with ongoing prevention and maintenance.